How to start using Pinterest for Business
Table of Contents Show
📌 Pin it!
Last updated in 2018
If you're a business owner (big or small), an entrepreneur, a solopreneur, a freelancer, or just consider yourself someone with a side-hustle, you're probably trying to figure out all the ways to to drive traffic to your online home base: your website.
You probably already know there is this platform called Pinterest, and everyone is on it, but what are they doing with it? How does it work for businesses? Where on earth do you start??
Maybe you have a brand new account and you don't know how to grow a following, or if you should even grow a following?! (Do followers even matter on Pinterest??)
Or maybe you have an old account, but you aren't sure what to do with it, or how to make it work for your business.
Whatever the case, if you're not utilizing Pinterest for Business, you're missing out on a huge traffic driver, second only to Google (for me). In fact, Google & Pinterest alternate between 1st and 2nd in the largest traffic driving sources for my own website.
So, on that note, let's talk about how to start using Pinterest for your business.
What is Pinterest?
If you're already on Pinterest for personal or business use, don't let this question fool you!
First and foremost, Pinterest is NOT a social media platform. I know that seems wrong to some of you, but it isn't. Think about it: do you interact with other people on Pinterest like you do with Facebook, Twitter, or Instagram? Nope!
Pinterest is an image search engine.
Yes, you can send pins to your friends with their messaging system. Yes, you used to be able to "like" pins, and you can still comment on any pin. Those actions are secondary to the main use of Pinterest though, right?
When you use Pinterest, you’re typically looking for something. Whether your goal is to find a recipe, tutorial, quotes, fitness workout routines, design inspiration, DIY tutorials… Basically, you name it; it’s there, and people are searching for it.
How do you start using Pinterest for business?
We’re going back to the beginning folks because I don’t want to leave aaaaaanyone out.
1 | Create a business account
You can convert a personal Pinterest account to a business account if you want, or you can start from scratch and create a Pinterest business account. Pinterest is totally free to use.
The only thing I would say about switching from personal to business is that you will need to reevaluate your boards and pins, descriptions, contact information, and all that stuff. Especially if you tend to pin things that are not related to your business. Make most or all of your non-business boards Secret, so you can still use them, but viewers won’t see them.
Having some non-business related stuff is okay, you just don't want those boards to out-number your business-related boards or it will seem like your business isn't a priority there. Having fun, personal boards makes you more human and relatable, so just find the balance that works best for you.
I only say that, because you want to be driving traffic that consists of your ideal client or your target market, right? For example, if you have a nail salon business, you don’t want to be mostly pinning things that attract people looking for recipes or fitness. You want to be attracting the types of people you actually want to walk in the door of your salon.
2 | Make strategic choices in your settings
Once you’ve created a business account, whether you started from scratch or switched over, you need to set up the information strategically.
Choose your username and make it exactly the same as (or as close as possible to) your other social media usernames/handles.
Give your business page a good (and accurate) title and description.
Upload a professional photo of you (which I highly recommend), or your logo if you refuse to use a photo of yourself (yep, I'm talking to you, introverts!). The reason I prefer you use a professional photo instead of a logo is because it humanizes you and your brand. It also makes you more relatable because your audience can see the real person who runs the account.
3 | Enable Rich Pins
Rich pins are just pins that have additional information on the pin and help you stand out more in the Pinterest newsfeed.
On an individual Pin, Rich Pins of your content display the following information:
Blog post title or product name
Image
Pinterest username - If the site is verified by a Pinterest account, this Pinterest username will display. Otherwise, this will say Sold by (Squarespace) or Posted by (Squarespace).
Price (for products only)
Site title
Visit link to the product or blog post
On a Pinterest board, Rich Pins display the following:
Blog post title or product name
Image
Image caption (If there's no caption, the filename displays)
Title of the blog post or product
Saved from URL
Site title
You can follow Pinterest’s guide to enabling Rich Pins here. If your site is on Squarespace, enabling Rich Pins is pretty simple. If your site has a custom domain, follow these quick steps to enable Rich Pins:
Visit your site while logged out or in an “Incognito” window
that term may be Chrome specific, but most browsers have an equivalent.
Open any blog post or product item page.
Note: Ensure the URL has your custom domain in it (not your built-in domain) and that the URL is for a specific post or product, not the collection landing page.
From the browser address bar, copy the URL.
In a new browser tab, go to Pinterest's Rich Pins Validator.
Paste the URL into the Enter a valid URL box.
Click Validate.
A confirmation message will appear.
Some domains require an extra step. If you're prompted to, check HTML Tags, and then click Apply.
4 | Add Pin it buttons and share buttons
On Squarespace, under “Marketing,” then “Pin it Buttons.”
Then from the drop-down menu at the top of that section, select whichever applies to you: “Enabled for Blogs,” or “Enabled for Blogs, Pages, and Products.”
After you select that, you have a number of styling options for the button itself, which you can change if you want. Then click Save. Done!
5 | Best Practices: Pinterest image sizes
Typically taller images do better because they appear larger in the feed. My Pinterest images are now 533 w X 900 h pixels, but feel free to test out different sizes, and see what works best for you.
There are several places that will give you updated (recommended) image sizes for Pinterest, and Canva is one of them. Canva’s Pinterest template is 735 w X 1102 h pixels (as of fall 2017).
If you don’t know what Canva is, a portion of their service is free to use (though you get a lot more usability if you’re on a paid plan), and you can create graphics with it pretty easily. So if you’re not a designer, that is a great place to go to create blog graphics and images for Facebook, Instagram, Twitter, and more. They have an iOS app, and you can use it in your internet browser as well.
In general, use your own judgment on what will match your branding, but here are some rules of thumb to go by as a guide:
use the same group (or similar) of font styles across all the images
no more than 2-3 max, per image
use a legible font style for the title
handwritten styled script is very popular right now, but depending on the script it may not be very legible, so choose wisely
either place a background behind the text so it’s readable or place text in open areas of the image
(examples below)
make the title large enough that the most important part of it can be clearly read when the pin image is small
make sure your URL is on the pin somewhere, so it can always be traced back to you (even if the link is removed from the pin, or the pin description is re-written)
most of Pinterest’s users are women, so pretty colors and images tend to do better (for me)
there are men using Pinterest also, and if they are your target market keep that in mind when you design your pins
make your blog post images Pinterest-worthy, so that when you publish a blog post from Squarespace, it will be appropriately sized when Squarespace pushes that post to Pinterest for you
Here are some examples:
6 | Best Practices: Adding Content to your Pinterest account
There are two distinct thoughts on this, so I’ll tell you both, give you my thoughts on each and you can decide for yourself!
post mostly your content, and only share some content from others
use the 80/20 rule, or 70/30, depending on who you ask.
80% OTHER’S content, 20% yours
(or 70% OTHER’S content, 30% yours)
I tend to lean more toward the 80/20 or 70/30 rule because I genuinely enjoy helping people. When I find relevant and helpful content, even if it’s not mine, I don't have a problem sharing it if I think it might help someone else.
Sharing only your own content may work further down the road when you have hundreds of blog posts to share from, but especially when you’re first getting started, you shouldn’t pin the same thing over and over again just because you have nothing else of yours to pin. So you’ll basically have to pin other people’s content in order to stay active in the Pinterest newsfeed.
You can create multiple images that link back to the same blog post. However, if you choose to do that, make sure each image has the real blog post title on it so you’re not misleading anyone (that won't create or establish trust). It will give you more ways to test your pin designs (you’ve heard of A & B or A/B Testing?) and see what people like best, and also possibly attract different crowds.
7 | Add relevant keywords
This is where it sucks to have converted your personal account to a business account. 😄 I’m only (partially) kidding.
As I said before: Pinterest is a search engine. So like Google, Pinterest uses keywords to pull up relevant pins for each user.
Now Pinterest also uses hashtags, but they still recommend that we use keywords as well. I'm guilty of doing more hashtags now than keywords in my Pin descriptions, but I still use keywords in the board descriptions.
Anyway, that means in order for your pin to be found by other Pinterest users, you (ideally) need to KEYWORD or HASHTAG the description for every pin and every board.
You even need to strategically place keywords in your bio, and it wouldn’t hurt to also place one or two keywords in your Pinterest page name. What do I mean by that last bit?
My profile name is: “Launch the Damn Thing | Squarespace Web Designer.”
My bio is (they are very short, about 160 characters):
“🖥️ #Squarespace #Website badassery: #custom or refresh old sites, –or buy a customizable DIY #template in my shop!”
That way people can find me, specifically, if they search for any of my keywords like freelance, graphic designer, small business, entrepreneur, branding, or websites.
On your boards and pins, only use keywords that pertain to the item(s) you are pinning, so those terms (and therefore your pins) are searchable for those keywords specifically.
For example, my blog board’s description is a long list of 62 keywords or phrases that pertain to pins I've posted to that board. Every pin inside that board also has its own unique description of keywords that pertain to that blog post.
Now, everyone does their descriptions differently, and there’s no real right or wrong way, only what’s most effective for you. Some people use paragraph form, inserting keywords into the paragraph naturally. I don't have that kind of time or patience, so I just literally list my keywords in the description, separated by commas.
I’ve found that if I consistently keyword all of my descriptions, they get more reach and re-pins. So, each of my own pins starts off with a one-sentence blurb covering the basic idea for the blog and the rest is 14-30 keyword phrases in hashtag form.
8 | How To Stay Active on Pinterest
Okay, so I started using BoardBooster, and it worked just fine, though their user interface is a bit dated, cumbersome, and not that user-friendly.
I’ve since switched from BoardBooster to Tailwind, and then from Tailwind to Planoly (both sanctioned by Pinterest).
What do these services do? They are all tools that allow(ed, in BoardBooster’s case) you to choose a bunch of pins and schedule ahead, so that you can set it & forget it, in bursts. Why does that matter?
Pinterest marketers suggest a wide range of total pins to post per day, ––anywhere from 2-5/day all the way up to 25+/day, depending on who you ask & how the algorithm is changing.
––I’m sorry, but who the hell has that kind of time (to post 10-100x a day)?! Not me & even if I did, frankly that’s one of the LAST things I’d want to spend time on.
So! In order to stay active in Pinterest’s feed, I tend to schedule my pins at least a week at a time (sometimes a month or two), and Planoly posts them for me.
9 | Use a Pinterest-sanctioned Scheduler
This could truly be a whole post in and of itself, but I’ll keep it short because this post is getting long and I’ve got more to cover!
sanctioned by Pinterest (ie: it’s an official Pinterest partner)
simple
free plan
affordable plans, starting at $7/mo (annually)
Solo plan allows 2 social profiles: 1 with unlimited uploads, and the other limited to 30 uploads/month
1 user
cheaper than Tailwind per year
works with the same scheduler you might already be using for Instagram posts
pin photos or videos
basic analytics
quick schedule (frequently used posting times)
campaigns: create a set it & forget it auto-post library, with over 150 images per week, and up to 24 pins/posts per day)
Planoly browser extension to pin from the web easily, just like Tailwind
Their cancellation refund policy is reasonable
If you subscribe through Apple, you’ll have to ask them for a prorated refund, but they do reply quickly & are happy to issue one if requested.
If you subscribed through Planoly’s website, you can request it there, directly from Planoly.
Back before I consolidated my Studio 1862 brand with my Launch the Damn Thing brand, I had 2 accounts for everything & was trying to eliminate some of my extra expenses, so I tried switching to Buffer which was cheaper for multiple accounts per social media platform… which didn’t last; I came back to Planoly within a month. LOL
Tailwind
sanctioned by Pinterest (ie: it’s an official Pinterest partner)
cheaper than Board Booster (which has since shut down)
pay per year = unlimited pinning
better analytics
easier to use
mobile iOS app
Chrome plugin
automatically chooses times when your followers are most active
gives you more posting time flexibility
(a specific time, in intervals or at their suggested time)
posting to multiple boards at once & use the same description
interval posting for duplicate pins
(for when you'd like to put the same pin in multiple boards, but you don't want them to pop up in your viewers’ newsfeed all at once)
They have a “No refund” cancellation policy, even if you pay annually & cancel before the end of your plan.
God forbid you make an annual payment & then decide you don’t want to use it after all. Even if you actually cancel your plan within 30 days of payment, you STILL have to fight them to get a prorated refund.
When I decided to switch to Planoly, I had just paid for another year of Tailwind (via an auto-renew payment I didn’t catch in time to stop) so I asked to cancel and they helped me do that. I expected them to issue a prorated refund for the other 11 months I’d no longer have paid access to Tailwind,…. 🦗(crickets). I actually had to be VERY straightforward, hard-nosed & tell the rep I wanted to speak with their manager, saying it felt like they were stealing 11 payments from me before they were willing to issue a prorated refund. RIDICULOUS. I do not want to have to be a bitch in order to get a refund; that’s not good CS.
Board Booster
(Board Booster is no longer available. They shut down in June of 2018.)
10 | Results!
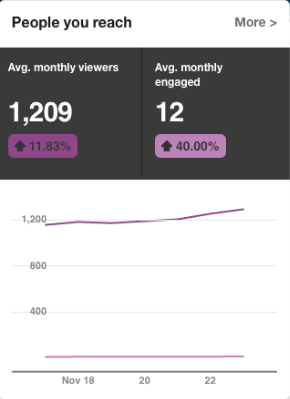
If that little bit in my blog post image caught your attention, about how I reached 18k on Pinterest (monthly) within 8 months of opening my business account, then here’s where things really get interesting!!
In a couple years, without an aggressive pinning strategy (just 2-4/day) & zero ads (or sponsored pins), I’ve grown my followers from 0 to 1050 and counting, and I steadily gain a few new followers each week (though it's debatable whether followers matter as much on Pinterest, as they do on other platforms).
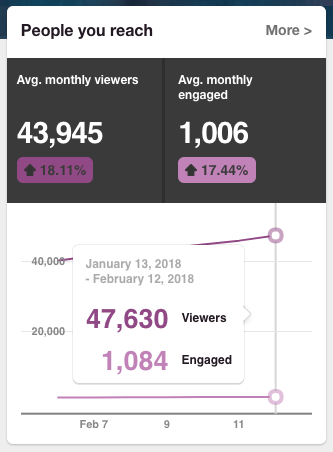
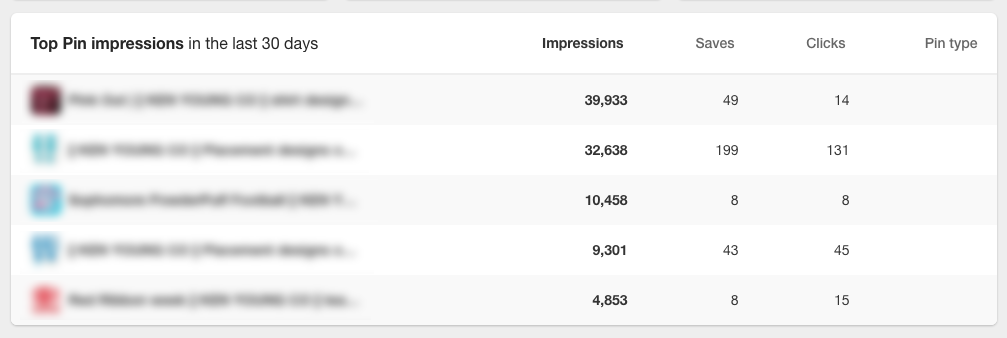
These are actual screenshots of my Pinterest Analytics (below) during the first 8 months of creating my Business account for Launch the Damn Thing, plus a few extras to see how it's continuing to grow:
*I've also added some newer ones (as of 2018) so you can see the continuous growth and have the confidence that you can do this too!
Don't forget to follow along with me on Pinterest for a steady stream of helpful tips & tricks! 😉
Since then I've continued to grow by using these strategies I've shared with you today. If you keep at it and give it some time for that snowball to start rolling down the hill, then you can make these strategies work for your business too!
Now, this next set of analytics is from a client account, which I set up from scratch.
Now, get this:
they have significantly fewer pins on their account than I have
approximately 300+ total pins vs. my 5,000+
they also only have 26 followers (as of Oct 2017)
grown from 0
they don’t post anything on a daily or even monthly basis
they will occasionally add a new pin, or a few new pins as necessary, here or there, but otherwise, it’s left completely alone
they don't use Tailwind or anything to schedule; it's all manual
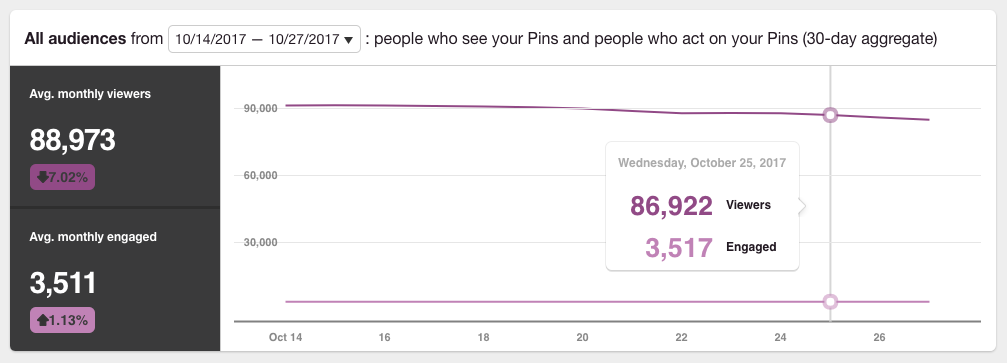
That being said, here are their current stats (I set up the account in February, and 8 months later):
🙌🏻 HOOOOOLY CRAP! AM I RIGHT?! 🙌🏻
I’m showing you these screenshots to prove that Pinterest can be successfully used for business marketing purposes, with very little cost involved, and it can work for any business type!
It took a few hours (over a few days) to add all the images, links, and keywords for each pin, board, bio, etc., but clearly, it was worth it, because their account reaches a lot of people each month!
Now that kind of reach isn't necessarily sustainable without being active on Pinterest in one way or another, whether that's pinning life a couple times a day, or using a scheduler to do it for you. Without being active, those analytics numbers will jump up and down, depending on what you're doing and how popular your profile is.
For example:
After a few more months of no activity (after the above screenshot was taken), this client account sank from about 90k monthly views to about 30–40k monthly views. When their content got popular again, their monthly views went back up around 80k, without them being active again. See? Inactivity = inconsistency.
If you keyword your account well, it can drive a lot of traffic to your website!
Then you have the potential to drive THOUSANDS of people to your website every month.
The higher your reach, the more buyers/clients/customers will be likely to cross paths with your site & come knocking on your digital door (website).
Remember:
Reach is basically the same as impressions, so it’s just the number of people scrolling passed your pins, not necessarily the amount that engaged with your pins or clicked through to your site. Keep an eye on your most popular pins, create several versions & pin (& repin) them all to keep them in circulation & increase the likelihood that people will click through!
The average purchase rate is about 2-3% for most people, which means for every 1,000 viewers, only 20 or 30 people will make a purchase. I know, right? That's kiiiiind of depressing.
HOWEVER, if you can reach 100,000+ people on a monthly basis that actually engage with your content, then your 2-3% purchase rate is much higher, at 2,000 or 3,000 people (per month) who are more likely to make a purchase from you! Now that's what I'm talking about!
My account was the perfect example of this: at about 112,000 monthly views, only about 3,000 people were actually engaging with my pins. That's about a 2.5% conversion rate for my own account.
So the more traffic you can get, the better off you'll be. 🙌🏻
*DISCLAIMER: While these are my own personal results & results of one of my client's accounts, you should know that Tailwind also publishes the Typical Results of Tailwind for Pinterest Members/Typical Results of Tailwind for Instagram Members each year. There you can see the average growth rates for all of their members & see what the actual ranges are. 📊
Got a handle on your Pinterest SEO game?
Now it’s time to get your SEO up to speed on your Squarespace website!


